Hey Team,
So with that many people out there now wanting to capture their adventures and share them with the wide web, it can be a mine field trying to figure out what system is best to invest in, I too had this struggle some years back and went with the Sony AX53, which is one model up from what we are looking at here. Having used this camera weekly for the last 4 years I’d like to think I have a pretty good opinion of it.
And the differences between the 53 and the 43 are pretty minor so you could say I’ve been reviewing this for the past 4 years.
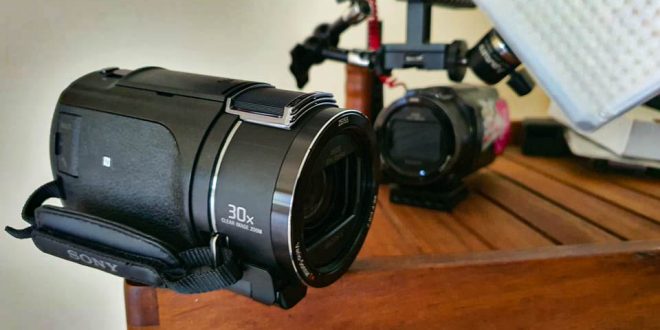
First of all what is it? well its a gimbal-stablizied, 4k handy cam. which sounds pretty neat, because it is.
Specs
SENSOR TYPE 1/2.5 type (0.28 in) back-illuminated Exmor R CMOS Sensor
IMAGE PROCESSOR BIONZ X™ image processor
LENS TYPE ZEISS® Vario-Sonnar® T*
FOCAL DISTANCE f = 4.4 to 88 mm
OPTICAL ZOOM 20x
CLEAR IMAGE ZOOM 4K: 30x, HD: 40×3
DIGITAL ZOOM 250×4
LCD SCREEN TYPE 2.95 inch (3.0 type) Clear Photo LCD display (460,800 dots) Wide (16:9)
RECORDING FORMAT (VIDEO) XAVC S format: MPEG4-AVC / H.264, AVCHD format ver. 2.0 compatible: MPEG4-AVC / H.264, MP4: MPEG-4 AVC / H.264
VIDEO RESOLUTION XAVC S 4K: 3840 x 2160 / 30p, 24p, XAVC S HD: 1920 x 1080 / 60p, 30p, 24p, AVCHD: 1920 x 1080 / 60p (PS), 30p (FX, FH), 24p (FX, FH), 60i (FX, FH), 1440 x 1080 / 60i (HQ, LP), MP4: 1280 x 720 / 30p
I did look at tricking up a DSLR as suggested by some people for film making, which has its merits but as this was going to be the first big investment ( which full disclosure Sony did help us out with this purchase) I put a lot of time into researching what would be best for us.
One of the key things that I had in mind was ease of use. Often we’l pass the camera around people present at an event or something like that and being easy to use is super important, everyone knows how to use a handy cam, the fundamentals of that haven’t changed in 20 years. So that box was checked for a familiar platform, DSLR set ups can be really tricky to understand to someone whos not used to filming especially when you add a gimbal it can be overwhelming for a new person. This system we have can be ( and has been) operated by the biggest of morons without issue.
building out the platform for different purposes was important too – sometimes we might have 2 talking heads mic’d up on lav mics in a dim room that needs extra light thrown so we can attach those things to the Small rig cage I picked up for maybe $200? from Photogear making it a very adaptable system which can be quickly changed to a shotgun mic for following people around events and capturing sound in a directional manner and throwing a fairly in expensive Rode mic ( again from photogear) gives perfectly useable audio for YouTube or social media. Equally this can be thrown on a tripod or a fluid head and used for many things. – More on that is lenses, if you’re running a DSLR set up and you’ve got say a 18-25mm lens on your camera for talking head / vlog style filming and you see something in the distance you want to reference you’d have to change out ( or have another camera) to capture something far away, the AX has a 20x optical zoom ( more with digital but I turn it off as the quality isn’t there being a digital enhancement) you can get right up close and be fairly stable at say a moving car or an animal a fair ways off which you simply couldn’t get on a DSLR set up without a lot of faffing around.
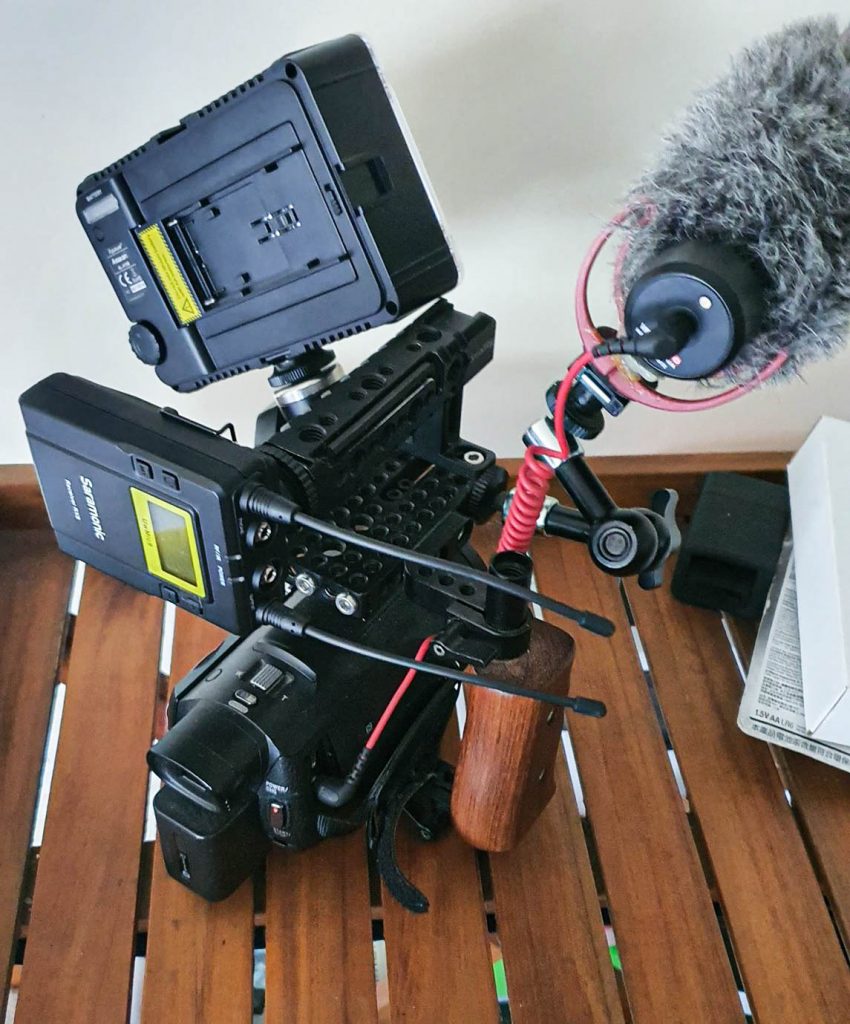
On board audio isn’t amazing, but the 3.5mm input allows for a decent amount of options, from wireless lav mics to shotgun mics you can get a more than good enough result for social platforms and you can spend more if you wish but we find the Rode video mic to which is unpowered to be fine and its not another thing to switch on and forget about and missing audio on. Being totally passive like that means no lost audio. The only issue I’ve had with that is messing around on the go and not seating the jack 100% in and missing a couple clips but the viewfinder has an audio gain read out on it which is a good visual reference to make sure you’re picking up audio, and if audio is really important you can plug in headphones to get accurate readings of how your audio is being captured. Do take note if you’re using something like wired ear buds from Apple or anything that has power running through the headset it can create interference on the signal – it can also be susceptible to digital signal noise if filming inside a car or something like that where there is a strong electrical field but we’ve only seen that a few times.
In terms of a view finder, the onboard flip out screen is fine, its quite small and hard to guage focus on and often hard to see in direct sunlight, the eye piece is a way around that on both counts. Plenty of information on the read outs on the screen as I mentioned before for audio pic up and other things – you can add things like ” zebra” lines for exposure peaking if you’re running the manual exposure which the 43 can’t do the same way the 53 does it – but for the most part the system is really good at figuring out all those things on its own and can largely be left to do what it will do and get good results. If you are really needing to see what you’re filming in real time you can add something like a SmallHD view finder screen for around $1000 for one worth getting, these are great but create some other issues, for example I use the opening and closing of the onboard screen to power on and off the camera from shot to shot ( it does has a power save feature if you leave the view screen open and aren’t recording or outputting but this isn’t ideal for run and gun filming. Adding an external monitor would change that routine so its really down to if its worth it to you, but like most of the extras you can add, its nice to have the option if you want it.
For the most part people wont notice the difference in the sensor between the 43 and the 53 and many would argue at the extra $100 for the 53 is worth it. I’d be inclined to agree with that. The major difference in the build is the adjustment ring which provides the ability to give mnaual control over things like exposure, focus or zoom and a bunch of other adjustments – for the average point and shoot buyer this wont matter, for those wanting to get creative it can be a really nice feature to have if you’re semi pro or looking to get there. Adjustments are assigned via the menu and can be toggled between manual and auto at the touch of a button.
The quality itself is fantastic, plenty good for social media purposes like YouTube being ableto capture in 4k gives so many options for post production like cropping without losing quality or colour grading choices. I think the thing with these cameras ( and this is a running thing I’ve found with sony) is the ability to learn and grow with the device and it will grow with you. You could start using easy mode with everything on Auto and slowly learn how things work and what they mean and ease into manual settings and more challenging shoots, which for the last 4 years with the 53, is exactly what we have been doing
Here’s an example of the quality of the footage from the 53 – we purposely put it into some challenging tasks to see how it handled it, and skids are cool
Battery power on this big Sony batteries can last easily a day of shooting if you use the method I do of popping the screen out as you need it and turning it off when you’re not shooting something, constant run time I’d say would be a couple of hours so you’l want a decent size memory card – at least 64gb but ideally 128gb.
Overall this is a robust, capable unit that’s small in size yet huge in opportunity – at $1799.00nzd ( at rubber monkey at the time of review) its far less expensive a proposition to get some high quality footage for your YouTube channel or home movies with plenty of room for growth as you expand your arsenal of gear – Along side the AX53 we run a a6500 for the vlog style shooting where size is everything and an A7iii mostly for photography but if we want those buttery images with the nice depth of field that’s always an option and given they all share the same formats and software they integrate well in premier which is my chosen editing software. OF course a Gopro or two wont go a miss and you can set the settings for the gopro to match the sony – I use as a standard 1080p at 50fps at a high bitrate to get the best 1080p picture, however for some footage i’ll jump over to 4k for that crisp finish or if its a timelapse that I want to add movement to later or punch in on in post. Probably the one gripe that I have that yet I haven’t found a fix for, the photo button. The still image capture button is right behind the zoom rocker, and often gets accidently triggered when going for the zoom. This is unavailable in some formats, which promts a message on the screen so the screen becomes useless for a few moments till its cleared. If i can find a way to disable it entirely I would as its never used.
Hope this has been of some insight and helps your buying choices, questions are always welcome – This wont be the device for everyone but it sure is a great place to start for most.
– Nick

Latest posts by Nic (see all)
- Google X FitBit | Review - July 7, 2026
- Jackass Best and Last | Reivew - June 30, 2026
- Supergirl | Review - June 25, 2026
- Samsung Mirco RGB | Review - June 23, 2026